step by step guide to gel nails

Step-by-Step Guide to Gel Nails
Gel nails offer a durable, chip-resistant manicure, widely available at salons and increasingly popular for at-home application. This comprehensive guide details each stage,
from preparation to removal, ensuring a flawless and long-lasting finish.
Understanding Gel Nail Systems
Gel nail systems represent a significant advancement in nail technology, offering extended wear and a glossy finish compared to traditional polish. Unlike standard nail polish that air-dries, gel polish requires curing under a UV or LED lamp to harden, creating a durable, chip-resistant coating. This curing process polymerizes the gel, bonding it firmly to the natural nail.
These systems aren’t simply one product; they encompass various formulations designed for different needs. From lengthening nails with builder gels to providing color with gel polish (often referred to as Shellac), and adding strength with soft or hard gels, understanding these distinctions is crucial. The longevity of a gel manicure, often lasting two weeks or more, is a key benefit, making it a popular choice for those seeking a low-maintenance, beautiful nail look. Proper application and removal are vital for nail health.
Types of Gel Polish
Gel polish isn’t a one-size-fits-all category; several types cater to diverse nail needs and desired outcomes. Understanding these differences is key to selecting the right product for your manicure goals. The primary distinctions lie in their formulation, application, and intended purpose.
Soft gel, including popular brands like Shellac, offers flexibility and is easily soaked off for removal. Hard gel, conversely, is more rigid and requires filing for removal, providing significant strength and length. Builder gel is specifically designed for nail extensions and sculpting, adding both length and structure. Finally, standard gel polish delivers vibrant color and a durable, chip-resistant finish, cured under UV or LED light, offering a balance between durability and ease of removal.
Soft Gel vs. Hard Gel
Soft gel and hard gel represent distinct approaches to gel nail enhancements, differing significantly in composition and application. Soft gel, exemplified by Shellac, is characterized by its flexibility and ease of removal – typically through soaking in acetone. This makes it ideal for natural nail overlays and achieving a long-lasting, chip-resistant polish.
Hard gel, however, boasts a more rigid structure, providing exceptional strength and durability. It’s the preferred choice for creating substantial nail extensions or reinforcing weak nails. Unlike soft gel, hard gel necessitates filing for removal, as it doesn’t dissolve easily. The choice between the two depends on desired nail length, strength requirements, and preferred removal method.
Gel Polish (Shellac)
Gel polish, often recognized by the brand name Shellac, revolutionized manicures with its extended wear and high-gloss finish. Unlike traditional nail polish, gel polish requires curing under a UV or LED lamp to harden, resulting in a remarkably durable coating resistant to chipping and peeling. This process involves applying thin layers of color, each cured individually for optimal adhesion and longevity.
Shellac specifically offers a unique formula known for its relatively gentle removal process. While still requiring acetone soaking, it’s often considered less damaging to the natural nail than some other gel systems. Gel polish provides a vibrant, long-lasting color option, making it a popular choice for those seeking a low-maintenance manicure.
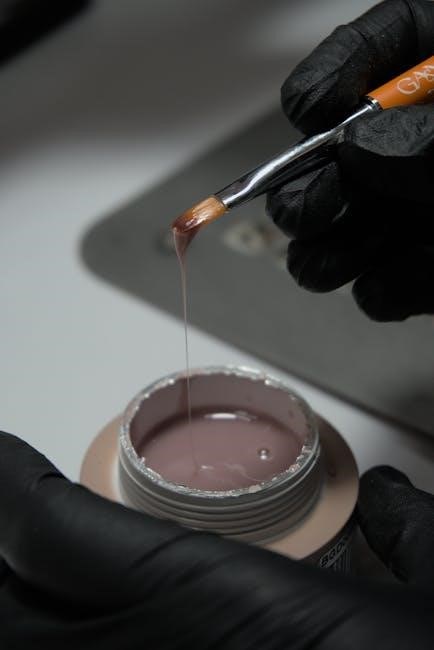
Builder Gel
Builder Gel is a thicker, more viscous formulation of gel used primarily for nail enhancements – lengthening, sculpting, and adding strength. Unlike gel polish, which is applied in thin coats, builder gel can be used to create a full nail extension or overlay, offering significant structural support. It’s ideal for repairing broken nails or achieving a desired shape and length.
Application typically involves using a brush to mold the gel onto the nail, often with the aid of forms or tips for extensions. Builder gel requires careful filing and shaping after curing to achieve the desired aesthetic; It provides a robust and durable finish, making it a preferred choice for those seeking substantial nail enhancements and a long-lasting manicure.
Essential Tools and Materials
Achieving a professional gel manicure requires specific tools and materials beyond standard nail polish. A UV or LED lamp is crucial for curing (hardening) the gel polish. The choice between UV and LED depends on the gel polish formula; some work with both, while others are specific.
You’ll need a gel base coat for adhesion, gel polish colors of your choice, and a gel top coat for sealing and shine. Nail files and buffers are essential for shaping and preparing the nail surface; Other helpful tools include cuticle pushers, nail clippers, lint-free wipes, and isopropyl alcohol for cleansing. Investing in quality materials ensures a smoother application and longer-lasting results.
UV or LED Lamp
The UV or LED lamp is the cornerstone of gel nail application, initiating a photochemical reaction that hardens the gel polish. UV lamps emit a broader spectrum of light and typically require longer curing times, around two minutes per layer. LED lamps, conversely, use a narrower light spectrum and cure gel polish much faster, often in 30-60 seconds.
When selecting a lamp, consider its wattage and compatibility with your chosen gel polish brand. Higher wattage generally means faster curing. Ensure the lamp is properly maintained and the bulbs are replaced regularly to maintain optimal curing efficiency. Always follow the manufacturer’s instructions for safe and effective use, protecting your skin from prolonged UV exposure.
Gel Base Coat
The gel base coat is a crucial first step, acting as a primer to help the gel polish adhere to the natural nail. It creates a smooth surface, preventing staining and promoting longevity. Applying a thin, even layer is key – avoid getting the base coat on the skin, as this can cause lifting.
Base coats also contain ingredients that protect the nail plate. Different formulations cater to specific nail needs; some offer strengthening properties, while others are designed for damaged nails. Proper curing under a UV or LED lamp is essential for the base coat to function effectively. A well-applied base coat significantly extends the wear of your gel manicure, preventing chips and peeling.
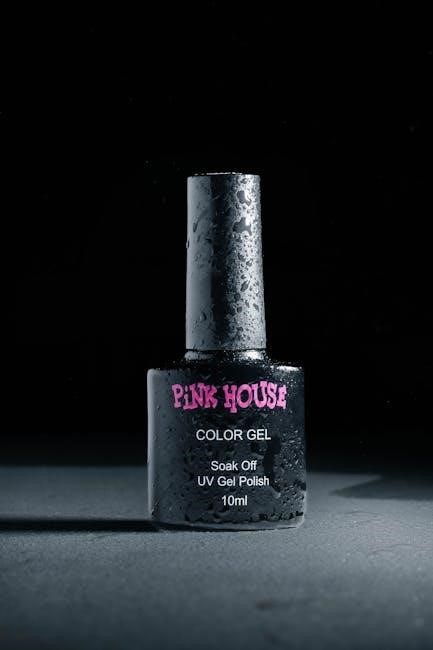
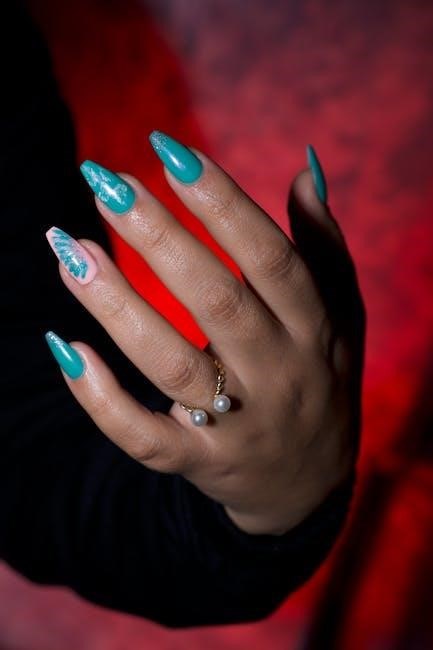
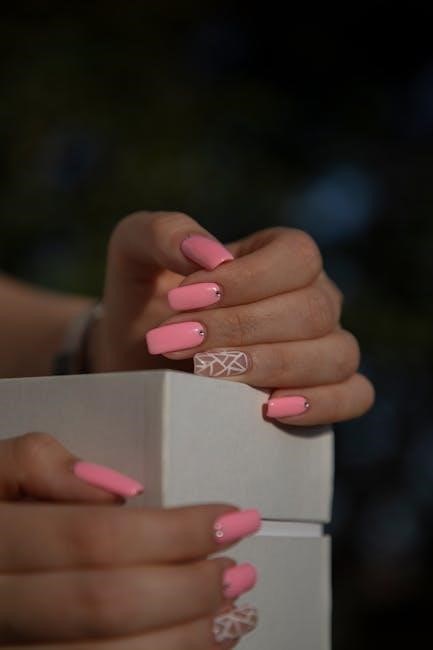
Gel Polish Colors
Gel polish colors are available in an extensive spectrum, mirroring traditional nail polish shades and offering unique effects like glitter, shimmer, and metallic finishes. The pigmentation in gel polish is typically richer than standard polish, meaning fewer coats are needed for full opacity. Applying thin, even layers is still vital to prevent bubbling or wrinkling during curing.
Color selection is a personal preference, but consider the occasion and your skin tone. Experimenting with different shades is part of the fun! Ensure each coat is fully cured before applying the next to build depth and prevent color bleeding. High-quality gel polishes boast long-lasting color and minimal fading, contributing to a professional-looking manicure.
Gel Top Coat
Gel top coat is the final, crucial layer in a gel manicure, sealing in the color and providing a glossy, protective finish. It prevents chipping and enhances the overall durability of the nails. Different top coats offer varying levels of shine – from high-gloss to matte – allowing for customization.
Application should be thin and even, encapsulating the entire nail surface, including the free edge. Proper curing of the top coat is essential; under-curing can lead to a tacky residue, while over-curing may cause discoloration. After curing, a quick cleanse with alcohol removes any inhibition layer, revealing a smooth, brilliant shine. A quality top coat significantly extends the lifespan of your gel manicure.
Nail File and Buffer
Nail files and buffers are fundamental tools for preparing the natural nail plate for gel application. A nail file shapes the nails to the desired length and form, while a buffer gently smooths the surface, removing shine and creating optimal adhesion. Different grit levels cater to specific needs; coarser grits are for shaping, while finer grits refine and polish.
Proper technique involves filing in one direction to prevent splitting and weakening the nail. Buffing should be light and even, avoiding excessive pressure that can damage the nail bed. A well-prepared nail surface ensures the gel polish adheres correctly, contributing to a long-lasting and flawless manicure. These tools are essential for a professional-quality result.
Nail Preparation: The Foundation for Long-Lasting Gel Nails
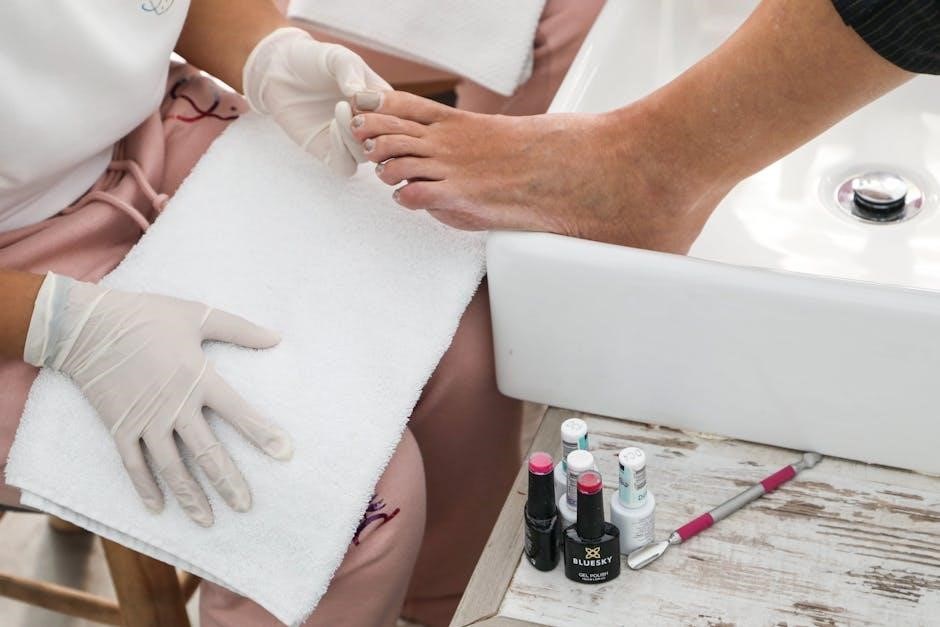
Thorough nail preparation is paramount for achieving a gel manicure that lasts and remains chip-free. This crucial stage involves several steps, beginning with the complete removal of any existing polish. Next, shaping the nails to your desired length and form is essential, followed by gently pushing back the cuticles to create a clean canvas.
Buffing the nail surface is the final step, removing shine and creating microscopic texture for optimal gel adhesion. Skipping or rushing this process significantly reduces the manicure’s longevity. A properly prepared nail plate ensures the gel polish bonds securely, preventing lifting and chipping, ultimately guaranteeing a beautiful and durable result.
Removing Existing Polish
Begin the gel manicure process by completely removing any previously applied nail polish. Traditional acetone-based polish removers work well for regular polish, but gel polish requires a specialized removal method. Soak cotton balls in acetone, place them directly on the nail surface, and secure with foil;
Allow the acetone to sit for approximately 10-15 minutes, softening the gel polish. Gently push off the softened gel with a cuticle pusher or orange wood stick. Avoid forceful scraping, which can damage the natural nail. If residue remains, repeat the soaking process. Ensure all traces of old polish are gone before proceeding to the next preparation step for optimal results.
Shaping the Nails
After removing existing polish, it’s time to shape your nails to your desired length and form. Utilize a nail file – a 180-grit file is generally suitable for natural nails – and file in one direction to prevent splitting or weakening. Avoid a sawing motion.
Choose a shape that complements your hands and lifestyle; popular options include square, oval, almond, and coffin. Once the length is established, refine the shape with the file, ensuring symmetry across all nails. A gentle buffing with a fine-grit buffer can smooth any rough edges and create a uniform surface, preparing the nails for optimal gel adhesion and a polished look.
Pushing Back Cuticles
Gently pushing back your cuticles is a crucial step for a professional-looking gel manicure. Never cut your cuticles, as this can lead to infection. Instead, soften the cuticles first with a cuticle remover or warm water.
Using a cuticle pusher (metal or wooden), carefully push back the cuticles towards the base of the nail. This creates more surface area for gel polish application and prevents lifting. Remove any dead skin (pterygium) adhering to the nail plate with a gentle scraping motion. Be extremely careful not to damage the live skin. A well-prepped cuticle line ensures a clean, long-lasting gel manicure, enhancing the overall aesthetic.
Buffing the Nail Surface
Buffing the nail surface is essential for gel polish adhesion, creating a slightly textured surface for optimal bonding. Use a fine-grit buffer – avoid coarse grits that can damage the natural nail. Gently buff across the entire nail plate, removing shine without thinning the nail.
This process enhances polish longevity, preventing chipping and lifting. Ensure even buffing to avoid uneven polish application. Don’t over-buff, as this weakens the nail. After buffing, remove all dust with a lint-free wipe and alcohol. A properly buffed nail surface is the foundation for a flawless, durable gel manicure, maximizing the polish’s wear time and appearance.
Gel Application: Step-by-Step
Gel application requires precision for a professional finish. Begin with a thin, even layer of base coat, avoiding the cuticle area to prevent lifting. Cure under a UV or LED lamp according to the product’s instructions – typically 30-60 seconds for LED and 2 minutes for UV.
Next, apply the first layer of gel polish, again avoiding the cuticles. Cure as before. Repeat with a second layer for full opacity and color richness. Ensure each layer is thin to prevent bubbling or wrinkling during curing. Finally, remember proper curing is vital for durability and a chip-free manicure.
Applying Base Coat
The base coat is crucial for gel nail adhesion and protection. Apply a very thin, even layer across the entire nail plate, ensuring complete coverage but meticulously avoiding contact with the cuticle. This prevents lifting and ensures a longer-lasting manicure. A small gap around the cuticle is essential.
Use a fine brush for precise application, especially around the sidewalls. Wipe off any excess base coat from the skin surrounding the nail. Proper base coat application creates a smooth foundation for the gel polish and enhances the overall durability of your manicure. Cure the base coat under a UV or LED lamp as directed by the product instructions – typically 30-60 seconds for LED.
Applying Gel Polish Layers
Apply the first coat of gel polish in a thin, even layer, similar to the base coat technique. Avoid flooding the cuticle area; maintain a small distance to prevent lifting. This initial coat is often sheer, serving as a foundational color layer. Cure under the UV/LED lamp according to the polish’s instructions – usually 60 seconds for LED.
Follow with a second coat for full opacity and even color distribution. Again, apply a thin layer and cure thoroughly. Multiple thin coats are preferable to one thick coat, as they cure more effectively and reduce the risk of bubbling or wrinkling. Ensure each layer is fully cured before proceeding to the next for optimal results and longevity.
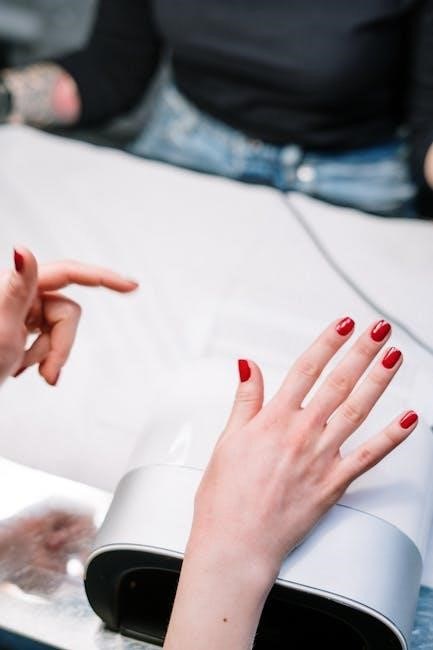
Curing Under UV/LED Lamp
Curing is crucial for gel polish to harden and bond correctly. After each gel polish layer (base, color, and top coat), place your hand under the UV or LED lamp. Ensure your nails are positioned correctly within the lamp to receive even exposure.
Curing times vary depending on the lamp and polish type; typically, LED lamps require 30-60 seconds, while UV lamps may need 2 minutes per layer. Always follow the manufacturer’s instructions for specific timings. Incomplete curing can lead to peeling or wrinkling, while over-curing can cause brittleness.
Check for tackiness after curing; a slightly tacky surface is normal and will be removed during the cleansing step.
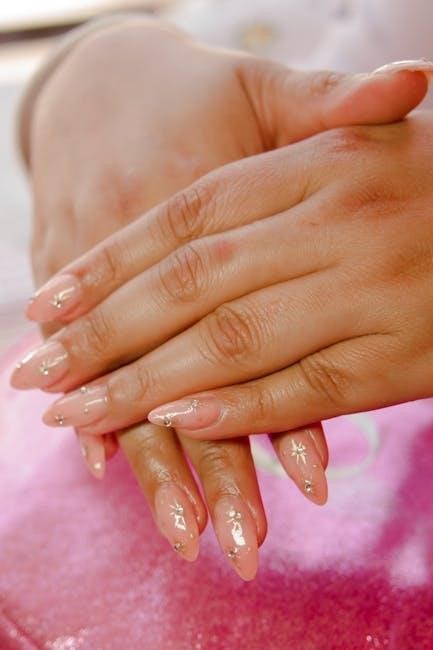
Finishing Touches and Aftercare
After applying the top coat and curing, a sticky residue often remains. This is called the inhibition layer and is easily removed. Saturate a lint-free wipe with isopropyl alcohol and gently wipe each nail to cleanse away this tackiness, revealing a glossy, smooth finish.
Hydration is key to maintaining healthy nails and cuticles. Apply a nourishing cuticle oil regularly, ideally several times a day, to prevent dryness and cracking. This also helps prolong the life of your gel manicure.
Avoid harsh chemicals and excessive water exposure, as these can weaken the gel polish. Wear gloves during household chores and consider using a gentle hand lotion to keep your skin moisturized.
Applying Top Coat
The top coat seals your gel polish, providing shine and protecting against chipping. Apply a thin, even layer, carefully capping the free edge of the nail to prevent lifting. Ensure the entire nail surface is covered, but avoid flooding the cuticles.
Curing the top coat is crucial for achieving its protective benefits. Follow the manufacturer’s instructions for curing time, typically around 60-90 seconds under a LED lamp or two minutes under a UV lamp. Insufficient curing can lead to a tacky or easily damaged finish.
Some top coats require cleansing after curing to remove a sticky inhibition layer. Use a lint-free wipe saturated with isopropyl alcohol to gently wipe each nail, revealing a high-gloss shine.
Cleansing with Alcohol
After curing the top coat, many gel polishes leave a sticky residue known as the inhibition layer. This isn’t uncured gel, but a byproduct of the curing process that needs removal for a smooth, glossy finish. Isopropyl alcohol, typically 70% or 99%, is the key to eliminating this stickiness.
Saturate a lint-free wipe with isopropyl alcohol. Gently wipe each nail, applying light pressure to dissolve the inhibition layer. Avoid harsh scrubbing, as this can dull the shine. Change wipes frequently to ensure you’re using a clean surface.

Proper cleansing reveals the true color and brilliance of your gel manicure. If residue persists, repeat the process with a fresh wipe and alcohol. This step is essential for a professional-looking, long-lasting result.
Hydrating Cuticles
Gel application, while providing a beautiful manicure, can sometimes be drying to the surrounding skin. Consistent hydration is crucial for maintaining healthy cuticles and preventing cracking or peeling. Neglecting this step can lead to discomfort and affect the overall appearance of your nails.
Apply a cuticle oil generously to each cuticle, massaging gently to encourage absorption. Look for oils rich in vitamins E and C, jojoba oil, or almond oil – these deeply nourish and restore moisture.
Regular hydration not only improves the health of your cuticles but also extends the life of your gel manicure. Incorporate cuticle oil into your daily routine, even between salon visits, for optimal results and beautifully maintained hands.
Gel Nail Removal: Safe Practices
Removing gel polish incorrectly can severely damage the natural nail. Avoid peeling or picking, as this strips away layers of the nail plate, leading to weakness and thinning. A safe removal process is essential for maintaining nail health.
Begin by gently buffing the top coat to break the seal. Soak cotton balls in acetone, place them on each nail, and wrap securely with foil. Allow to sit for 10-15 minutes.
Gently push off the softened gel with a cuticle pusher. If resistance is met, re-soak for a few more minutes. Never force the gel off. Follow with cuticle oil to rehydrate and nourish the nails, restoring moisture lost during the removal process.