bestway power steel pool setup instructions
Bestway Power Steel Pool Setup Instructions: A Comprehensive Guide
This guide details the complete process for assembling your Bestway Power Steel pool, covering everything from site selection to water filling and
maintenance․
Proper setup ensures safety and longevity, referencing manuals like 56477E and 56996, alongside visual aids like setup timelapses for oval models (488 x 305 x 107m)․
Bestway Power Steel Pools offer an affordable and accessible path to backyard summer fun․ These pools are renowned for their durability, stemming from the robust steel frame construction, providing reliable support throughout the swimming season․
Understanding the setup process is crucial for maximizing enjoyment and ensuring long-term pool health․ This involves careful consideration of location, ground preparation, and meticulous assembly of the frame and liner․
Referencing the official Bestway manuals (like 56477E and 56996) is highly recommended, as they provide detailed diagrams and specific instructions tailored to your pool model․ Proper setup minimizes risks and guarantees a safe, refreshing experience for all․
Safety Precautions Before Setup
Prioritizing safety is paramount before commencing Bestway Power Steel pool setup․ Always inspect the chosen location for underground utilities – contact local services if unsure․ Ensure the area is clear of any potential hazards like sharp objects, rocks, or tree roots․
Adhere to local pool barrier regulations, typically requiring a minimum height of 48 inches, to prevent unsupervised access, especially for children․ Electrical safety is critical; never run extension cords near the pool and consult a qualified electrician for pump connections․
Be aware of potential sinking issues and have a plan to address them immediately by draining water․
Unboxing and Parts Inventory
Carefully unpack all components of your Bestway Power Steel pool, referencing the parts list in the owner’s manual (e․g․, 56477E, 303021183290)․ Lay out all items in an organized manner to facilitate easy identification․
Thoroughly check for any missing or damaged parts․ If anything is absent or defective, immediately contact Bestway Customer Service for replacements – do not proceed with setup using incomplete or faulty components․
Allow the liner to sit in direct sunlight for at least one hour to increase its flexibility, simplifying installation and reducing the risk of wrinkles․
Checking for Missing Parts
A meticulous parts check is crucial before beginning assembly․ Compare all received components against the detailed parts list provided in your Bestway Power Steel pool manual (e․g․, 303021183290, 56477E)․
Pay close attention to frame pieces, liner, pump components, and all connectors․ Note any discrepancies immediately․ Missing parts can halt the setup process and compromise the pool’s structural integrity․
If any items are missing or damaged, do not attempt to improvise․ Contact Bestway Customer Service promptly to request replacements, ensuring a safe and complete pool installation․
Choosing the Ideal Location
Selecting the right spot is paramount for a successful Bestway Power Steel pool setup․ Prioritize a completely level surface to evenly distribute weight and prevent structural stress, potentially leading to collapse․
Proximity to a suitable drainage system is essential for managing overflow water, especially during filling or heavy rainfall․ Ensure easy access for pump connections and electrical safety considerations․
Consider sunlight exposure; allowing the liner to sit in direct sunlight for an hour or more increases its flexibility, simplifying installation and reducing wrinkle formation;
Level Ground Requirements
Achieving a perfectly level surface is critical for your Bestway Power Steel pool’s stability and longevity․ Even slight inclines can cause uneven weight distribution, stressing the frame and potentially leading to collapse․
Use a spirit level extensively during site preparation, checking multiple points across the intended pool area․ Any deviations must be corrected before assembly, utilizing appropriate leveling materials․
Remember that sinking can occur even on seemingly level ground․ Regularly monitor leg and support levelness post-setup, and be prepared to drain water and relocate if necessary․
Proximity to Drainage Systems
Strategic pool placement near adequate drainage is essential to manage overflow water effectively, preventing potential property damage and maintaining a safe pool environment․ Consider natural slopes or existing drainage solutions․
Ensure the chosen location allows for easy water dispersal away from the pool’s foundation and surrounding structures․ A nearby drain or a gently sloping yard is ideal․
Overflow can occur during heavy rainfall or when filling the pool, so proactive planning is crucial․ Proper drainage minimizes the risk of water accumulation and related issues․
Sunlight Exposure for Liner Flexibility
Exposing the pool liner to direct sunlight for at least one hour before installation is highly recommended․ This crucial step significantly enhances the liner’s flexibility, making it easier to spread and conform to the pool frame․

A flexible liner minimizes wrinkles and potential tears during setup, contributing to a smoother installation process and a longer-lasting pool․ The warmth from the sun softens the PVC material․
This pre-installation sun exposure is a simple yet effective technique, detailed in Bestway’s owner’s manuals, to ensure optimal liner performance and a successful pool setup․
Preparing the Ground
Thorough ground preparation is essential for a stable and long-lasting Bestway Power Steel pool․ Begin by meticulously removing all debris, including rocks, sticks, and any sharp objects that could potentially puncture the pool liner․
A smooth surface prevents uneven weight distribution and potential frame damage․ Consider utilizing ground covering options like a layer of sand or a protective mat specifically designed for under pool liners․
These coverings provide cushioning and further protect against punctures, ensuring a level base for your pool․ Proper preparation minimizes the risk of sinking and collapse․
Removing Debris and Sharp Objects
Before laying down your Bestway Power Steel pool, a meticulous clearing of the designated area is paramount․ Carefully remove all rocks, twigs, roots, glass shards, and any other potentially damaging debris․ Even small, seemingly insignificant objects can compromise the integrity of the pool liner․
Thoroughly inspect the ground, feeling for any hidden sharp protrusions․ A completely smooth and clear surface is crucial to prevent punctures and ensure even weight distribution across the pool base․
This initial step safeguards against costly repairs and maintains the pool’s structural stability․
Ground Covering Options (Sand, Protective Mat)
Once debris is cleared, consider a ground covering for enhanced protection․ A layer of fine sand provides a cushioning effect, conforming to minor ground imperfections and safeguarding the liner․ Alternatively, a dedicated pool protective mat offers a durable, puncture-resistant barrier․
These coverings distribute weight evenly, reducing stress on the liner and frame․ They also minimize the risk of root penetration or future debris causing damage․
Choosing between sand and a mat depends on site conditions and personal preference, both significantly contribute to a longer pool lifespan․
Assembling the Pool Frame
Begin by connecting the base rails, ensuring a secure and level foundation for the entire structure․ Carefully align the sections and utilize the provided connectors, tightening them firmly but avoiding over-tightening which could cause damage․
Next, install the vertical legs and U-supports, distributing them evenly around the perimeter․ Regularly check the position of these legs to ensure they remain level throughout the setup process․
Proper frame assembly is crucial for stability; a solid frame prevents potential sinking and collapse, especially during water filling․
Connecting the Base Rails
Start by laying out all base rail sections on a flat, protected surface․ Align the ends of each rail, ensuring the connector openings face each other․ Insert the connectors firmly into the rail ends, applying even pressure until they click securely into place․
Double-check each connection for stability; a loose connection can compromise the entire frame’s integrity․ Work your way around the perimeter, gradually forming the rectangular or oval shape, depending on your pool model․
Avoid over-tightening connectors, as this could potentially damage the rails․
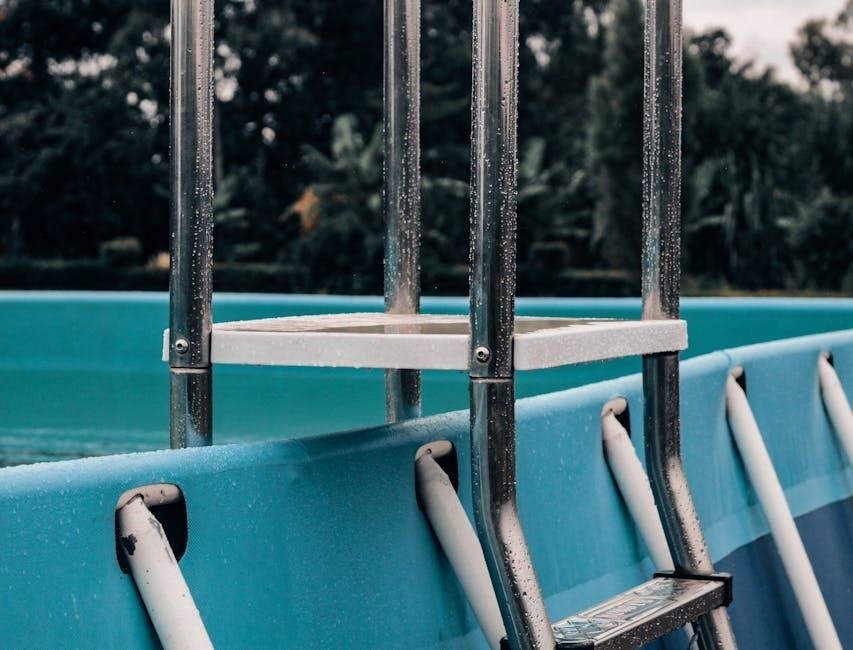
Installing Vertical Legs and U-Supports
Begin by inserting the vertical legs into the designated slots along the connected base rails․ Ensure each leg is fully seated and clicks into place, providing a stable upright support․ Regularly check the position of these legs to maintain levelness throughout the setup process․
Next, attach the U-supports to the legs, connecting them to the top rail sections․ These supports add crucial reinforcement to the frame, preventing bowing or collapse when the pool is filled․
Confirm all legs and U-supports are securely fastened before proceeding․
Liner Installation
Carefully unfold the pool liner and spread it out, ensuring it’s right-side up․ Expose the liner to direct sunlight for at least one hour, or longer, to increase its flexibility, making it easier to maneuver and reducing the risk of tears during installation․
Center the liner within the assembled frame, gently spreading it to cover the entire pool base․ Work outwards, smoothing out any wrinkles or folds as you go․
Secure the liner to the frame by attaching it to the top rail using the provided clips or fasteners, ensuring a snug and even fit․
Spreading the Liner and Avoiding Wrinkles
Begin by carefully unfolding the liner, ensuring it’s positioned correctly within the pool frame․ Gently spread it outwards, working from the center to the edges, to distribute the material evenly․ Prior to full spreading, allow the liner to sit in direct sunlight for an hour or more․
Address wrinkles as they appear by gently lifting and smoothing the liner․ Avoid pulling forcefully, as this could cause tears․ Small wrinkles may disappear as the pool fills with water․
Take your time and be patient; a properly installed liner is crucial for a long-lasting and enjoyable pool experience․
Securing the Liner to the Frame
Once the liner is spread and relatively wrinkle-free, begin securing it to the pool frame․ Carefully attach the liner to the top rail using the provided clips or fasteners, ensuring a snug but not overly tight fit․
Work your way around the entire perimeter of the pool, evenly distributing the liner’s tension․ Avoid stretching the liner excessively in any one area, as this can lead to premature wear or tears․
Double-check all connections to confirm the liner is firmly held in place, preventing slippage during filling and use․
Filling the Pool with Water
Begin filling the pool slowly and steadily, constantly monitoring both the water level and the stability of the frame․ As the water rises, periodically check that the legs and supports remain level, addressing any sinking immediately․
If sinking occurs, halt filling and consider draining some water to reassess the ground’s suitability or modify the surface․ Maintaining consistent frame integrity is crucial to prevent collapse․
Continue filling until reaching the desired level, remembering that water weight significantly impacts the structure․ Regular checks during this process are paramount for a safe setup․
Monitoring Water Level and Frame Stability
As the pool fills, diligent observation is key․ Regularly inspect the vertical legs and U-supports, ensuring they maintain levelness with the pool bottom․ Any deviation indicates potential ground instability or uneven weight distribution․
Pay close attention to the frame’s overall structure, looking for any signs of bending, warping, or stress․ Slow, incremental filling allows for timely adjustments and prevents overwhelming the frame․
Consistent monitoring minimizes the risk of collapse, especially during initial stages․ Immediate action is crucial if sinking is detected; drain water and reassess the setup․
Addressing Potential Sinking Issues
If sinking occurs during filling, immediate action is vital to prevent structural damage or collapse․ Stop filling immediately and carefully assess the affected area of the pool․
Drain the water sufficiently to relieve pressure on the sinking section․ Evaluate the ground beneath – is it adequately compacted or stable enough? Consider modifying the surface material with additional sand or a protective mat․
If the issue persists, relocation may be necessary․ Choosing a different, more level location is preferable to forcing a setup on unsuitable ground․ Refer to the Bestway manual (56477E) for guidance․
Filter Pump and Plumbing Connections
Correctly positioning the inlet (A) and outlet (B) is crucial for efficient water circulation and filtration․ Ensure these are appropriately aligned before connecting the plumbing․
Carefully connect the filter pump system, following the diagrams in your Bestway manual (56477E, 56996)․ Secure all connections tightly to prevent leaks․ Double-check that hoses are not kinked or obstructed․
Proper pump placement is essential; locate it on a level surface near a grounded electrical outlet, protected from the elements․ Refer to the manual for specific electrical safety guidelines․
Correct Positioning of Inlet (A) and Outlet (B)
Accurate placement of the inlet (A) and outlet (B) is fundamental for optimal water flow and effective filtration within your Bestway Power Steel pool․
The inlet (A) should be positioned to draw water from the pool’s surface, removing debris and promoting circulation․ Conversely, the outlet (B) directs filtered water back into the pool․
Ensure both fittings are securely attached and aligned according to the pool’s manual (56477E, 56996)․ Proper positioning allows seamless connection to the filter pump, maximizing its efficiency and maintaining water quality․
Connecting the Filter Pump System
Once the inlet (A) and outlet (B) are correctly positioned, connecting the filter pump system is the next crucial step in Bestway Power Steel pool setup․

Utilize the provided hoses to establish a secure connection between the pump, inlet, and outlet․ Ensure all clamps are tightened to prevent leaks and maintain optimal water pressure․
Refer to your pool’s manual (56477E, 56996) for specific instructions regarding pump placement and electrical connections․ Proper installation guarantees efficient filtration, contributing to clean and safe swimming conditions․
Electrical Safety Considerations
Prioritizing electrical safety is paramount during Bestway Power Steel pool setup․ Never run electrical cords underwater or allow them to come into contact with water․
Always use a Ground Fault Circuit Interrupter (GFCI) outlet for the filter pump and any other electrical devices near the pool․ A GFCI quickly cuts off power in the event of a fault, preventing electric shock․
Consult a qualified electrician if you are unsure about any aspect of the electrical installation․ Adhering to safety regulations ensures a secure and enjoyable swimming experience․
Pool Barrier Requirements (Safety Regulations)
Local regulations often mandate a barrier around above-ground pools for safety, particularly for young children․ These barriers prevent unsupervised access, reducing the risk of drowning․
A common requirement is a barrier height of at least 48 inches, measured from the ground on the pool side․ This height prevents climbing over or under the barrier․ Ensure the barrier fully encloses the pool area․
Gates must be self-closing and self-latching, with the latch positioned out of reach of small children․ Regularly inspect the barrier for any damage or weaknesses․
Barrier Height (Minimum 48 inches)
Maintaining a minimum barrier height of 48 inches is crucial for pool safety, preventing unauthorized access, especially by young children․ This measurement is taken vertically from the pool’s surrounding grade․
The 48-inch requirement aims to deter climbing, making it significantly harder for a child to scale the barrier and reach the pool unsupervised․ Local codes may even require greater heights․
Ensure the entire perimeter meets this standard, with no gaps or low points․ Regularly inspect the barrier’s height, as ground settling can sometimes reduce its effectiveness over time․
Regular Maintenance Checks
Consistent checks are vital for a safe and enjoyable swimming season․ Regularly inspect the pool frame, paying close attention to the vertical legs and U-supports to ensure they remain perfectly level․
Address any sinking immediately by draining water and evaluating the ground’s stability․ Monitor for potential shifts or unevenness, which could indicate a structural issue․
Routine inspections prevent collapse and extend the pool’s lifespan․ Consistent maintenance, as outlined in the Bestway manual (56477E), guarantees a worry-free experience throughout the summer․
Checking Leg and Support Levelness
Maintaining level legs and supports is paramount for structural integrity․ Use a spirit level to regularly assess each vertical leg and U-support around the pool’s perimeter․
Any deviation from level indicates potential stress on the frame and liner, increasing the risk of collapse․ Adjust the legs as needed to restore a perfectly horizontal plane․
Consistent monitoring, as recommended in the Bestway manual, prevents uneven weight distribution and potential sinking․ Address any imbalances promptly to ensure long-term stability and a safe swimming environment․
Troubleshooting Common Setup Issues
Sinking is a frequent concern; immediately drain water if detected and evaluate the ground’s suitability, potentially requiring relocation or surface modification․
Wrinkles in the liner often arise during initial filling; sunlight exposure for an hour or more enhances flexibility, aiding in smoothing․ Avoid forcing the liner․
Missing parts should be addressed by contacting Bestway Customer Service․ Ensure correct positioning of inlet (A) and outlet (B) for proper filter pump connection․ Refer to manuals 56477E and 56996 for detailed guidance․
Bestway Customer Service Contact Information
For assistance with missing parts or setup challenges, contacting Bestway Customer Service is crucial․ The official website, www․bestwaycorp․com, serves as a primary resource for support and frequently asked questions․
Direct contact details vary by region, so visiting the website and navigating to the “Support” or “Contact Us” section is recommended․ This ensures you reach the appropriate team for your location․
Keep your pool model number (e․g․, 56477E, 56996) handy when contacting them, facilitating a quicker and more efficient resolution to your inquiry․
Understanding the Power Steel Pool Manual (56477E, 56996)
The Bestway Power Steel pool manuals (56477E & 56996) are essential resources, providing detailed, step-by-step instructions for a successful setup․ These guides cover everything from parts inventory and ground preparation to frame assembly and liner installation․
Pay close attention to safety precautions outlined within, emphasizing the importance of level ground and proper drainage․ The manuals also detail filter pump connections and electrical safety considerations․
Referencing these documents minimizes errors and ensures adherence to Bestway’s recommended procedures, safeguarding your pool’s structural integrity and longevity․
Oval Pool Setup Considerations (488 x 305 x 107m)
Setting up a Bestway Power Steel oval pool (488 x 305 x 107m) requires specific attention to ensure structural stability․ Due to the non-rectangular shape, achieving perfectly level ground is even more critical to prevent uneven stress on the frame․
Utilize setup timelapses as visual guides, carefully observing how the curved sections connect and are supported․ Regularly check the position of vertical legs and U-supports during and after setup․
Monitor for sinking, and be prepared to adjust the ground or relocate the pool if necessary, as outlined in the owner’s manual․
Utilizing Setup Timelapses for Visual Guidance
Bestway Power Steel pool setup can be significantly simplified by referencing available setup timelapse videos, particularly for oval models (488 x 305 x 107m)․ These videos provide a condensed, visual walkthrough of the entire process, highlighting key steps and potential challenges․
Pay close attention to the order of frame assembly, liner placement, and support installation․ Timelapses demonstrate how components connect, offering a clearer understanding than written instructions alone․
Observe how installers address potential issues like liner wrinkles or frame alignment, providing valuable insights for your own setup․
Dealing with Overflow Water
Proper drainage is crucial during and after Bestway Power Steel pool setup․ Locate the pool near an adequate drainage system to effectively manage overflow water, especially during the filling process and periods of heavy rainfall․
Consider the pool’s inlet (A) and outlet (B) positioning in relation to the drainage․ Ensure water can flow away from the pool structure to prevent potential damage or instability․
Monitor water levels closely and be prepared to divert excess water if the drainage system becomes overwhelmed․ Proactive management prevents potential sinking issues and maintains pool integrity․
Importance of Liner Flexibility During Setup
Liner flexibility is paramount for a smooth Bestway Power Steel pool installation․ Before assembly, spread the liner and expose it to direct sunlight for at least one hour, or longer if possible․
This exposure increases the liner’s pliability, making it easier to maneuver and reducing the risk of wrinkles or tears during installation․ A flexible liner conforms better to the pool frame’s shape․
Avoid attempting installation with a cold, stiff liner, as this can lead to difficulties and potential damage․ Prioritizing liner flexibility contributes to a secure and long-lasting pool setup․
Preventing Pool Collapse
Maintaining structural integrity is crucial to prevent Bestway Power Steel pool collapse․ Regularly inspect the vertical legs and U-supports, ensuring they remain level throughout the setup and usage periods․
If sinking is detected, immediately drain the water to alleviate pressure on the frame․ Ignoring sinking can lead to catastrophic failure․ Consider relocating the pool or modifying the ground surface․
Proper ground preparation and consistent monitoring are key preventative measures․ Refer to the owner’s manual (56477E) for detailed guidance on maintaining stability and avoiding potential hazards․
Modifying the Surface Material if Needed
If the initial location proves unstable, modifying the surface material becomes essential․ Uneven or yielding ground can contribute to sinking and potential pool collapse, demanding corrective action․
Consider adding a layer of compacted sand or a protective mat beneath the pool liner to distribute weight more evenly․ Ensure the chosen material is free of debris and sharp objects that could puncture the liner․
Consult the Bestway manual (56477E) for recommended surface materials and preparation techniques․ Addressing ground issues proactively safeguards the pool’s structural integrity and extends its lifespan․
Post-Setup Inspection

A thorough post-setup inspection is crucial for identifying potential issues before fully committing to water filling․ Carefully examine the pool frame, ensuring all connections are secure and vertical legs remain level with U-supports․
Inspect the liner for any wrinkles, tears, or improper positioning against the frame․ Address these immediately to prevent stress points and potential damage during operation․
Double-check the filter pump connections (inlet A and outlet B) and electrical safety measures․ Refer to the Bestway manual (56477E, 56996) for a final verification of all setup steps․
Long-Term Pool Care and Maintenance
Consistent maintenance extends your Bestway Power Steel pool’s lifespan and ensures water quality․ Regularly check leg and support levelness, promptly addressing any sinking issues by draining water and potentially modifying the ground surface․
Maintain proper water chemistry, following filter pump guidelines and regularly cleaning the filter system․ Inspect the liner periodically for wear and tear, addressing minor issues before they escalate․
Prepare the pool for winterization according to Bestway’s recommendations (refer to manuals 56477E, 56996) to prevent damage from freezing temperatures and ensure a smooth reopening next season․